


How to Install a Drip Irrigation System?
The answer to how to install a drip irrigation system begins with a proper analysis of the production area. Before installation, the land and crop rows are measured, the flow rate of the water source is checked, the filtration unit is prepared, and the main line is laid. Then, drip irrigation pipes are positioned along the crop rows, the connections are completed, the pipes are flushed with clean water, and the system is tested under pressure.
A properly installed drip irrigation system delivers water directly and evenly to the plant root zone instead of spreading it across a wide area. However, simply laying the pipes on the land is not enough. If pipe diameter, emitter spacing, filter capacity, line length, and water pressure are not calculated together, different amounts of water may be discharged at the beginning and end of the system.
Before installation, we evaluate the structure of the production area and the equipment to be used together. This helps us reduce unnecessary material use, insufficient water distribution, and connection problems that may occur during the growing season.
Contents
Toggle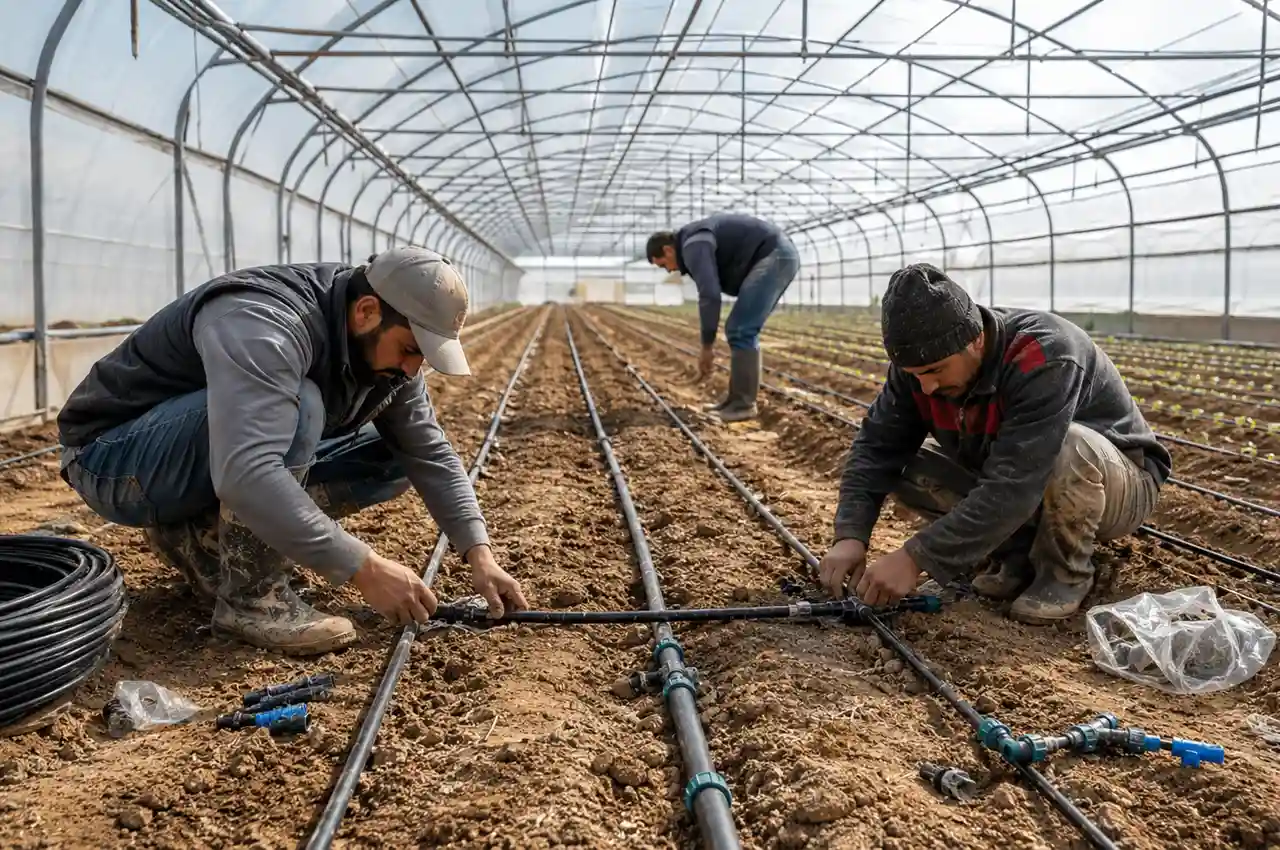
What Is a Drip Irrigation System?
A drip irrigation system is an irrigation method that delivers water directly to the plant root zone at low flow rates and regular intervals. Water flows through the main pipe, distribution line, drip irrigation pipes, and emitters in a controlled manner.
This system can be used in greenhouses, vegetable production areas, orchards, nurseries, and open-field agricultural land. In production areas with clearly defined crop rows, it is much easier to control where and how water is applied.
The primary purpose of the system is not simply to reduce water consumption. Its main goal is to deliver the available water to the right place, at the right time, and in the right amount.
What Should Be Calculated Before Installing a Drip Irrigation System?
The irrigation equipment used during installation should not be selected based solely on the total size of the land. Two fields of the same size may require completely different system designs depending on row length, slope, soil structure, and the available water source.
Land Size and Crop Rows
The width, length, and total irrigated area of the land should be determined first. Next, the number of crop rows and the length of each row should be calculated.
These measurements make it possible to estimate the required length of the irrigation pipe. The calculation should also include turns, connections to the main line, and an allowance for installation.
The following information should be recorded during the planning stage:
- Total production area
- Number of crop rows
- Row spacing
- Length of each row
- Route of the main pipeline
- Distance between the water source and the field
- Elevation changes and land slope
Crop to Be Grown
The root structure, row spacing, and irrigation requirements vary from one crop to another. Using the same emitter spacing for tomatoes, peppers, cucumbers, strawberries, citrus fruits, and olive trees may not provide the best results.
For densely planted vegetables, a shorter emitter spacing is generally preferred. In orchards, however, emitter placement should be determined based on the tree’s root development and canopy spread.
Soil Structure
In sandy soils, water moves downward more quickly. For this reason, irrigation may need to be applied more frequently and in a more controlled manner.
In clay soils, water tends to spread more horizontally. Excessive or prolonged irrigation can reduce air availability around the roots and lead to water accumulation.
When determining emitter spacing, it is important to consider not only the type of crop but also the soil’s ability to absorb and distribute water.
Water Source Flow Rate and Quality
Flow rate and pressure may vary depending on whether the system uses well water, a storage tank, canal water, or the municipal water supply. Sand, silt, algae, or other particles in the water can clog the emitters.
For this reason, the following checks should be carried out before installation:
- Hourly flow rate of the water source
- Water pressure available to the system
- Amount of sediment and sand in the water
- Risk of limescale buildup
- Filtration requirements
- Number of irrigation lines that can operate simultaneously
Materials Needed for a Drip Irrigation System
Although the parts used in a system may vary depending on the terrain, the basic installation components are similar. When selecting materials, the parts must have compatible diameters and connection dimensions.
Water Source or Water Tank
The system can start from a well, a reservoir, an irrigation pond, or a distribution line. The water source must provide sufficient flow during the irrigation period.
In areas where pressure is insufficient, a pump with appropriate capacity can be used. If the pressure is higher than necessary, pressure-regulating equipment may be required.
Filtration Unit
The filter plays a vital role in protecting the drip irrigation system. If sand, sediment, organic debris, and other impurities in the water are not filtered before entering the drip lines, the emitter passages may become clogged over time.
The filter should be selected according to the type of water source. Well water, open canal water, and stored water may each require a different level of filtration.
The filter capacity should never be lower than the total flow rate of the irrigation system. It should also be installed in a location where it can be easily inspected and cleaned on a regular basis.
Main Line Pipe
The main line is the primary pipe that carries water from the source to the production area. Its diameter is determined based on the total flow rate, pipeline length, land slope, and the number of irrigation zones operating at the same time.
Due to their flexibility and suitability for long-distance installations, PE Coil Pipes are commonly preferred for agricultural main lines. Their ability to be installed in longer continuous sections helps reduce the number of connection points.
Selecting a main line that is too small can increase friction losses within the system. As a result, water pressure may decrease by the time it reaches the end of the pipeline.
Drip Tubes
Drip Irrigation Pipes are the irrigation lines that carry water from the main pipeline along the crop rows and deliver it directly to the root zone through emitters.
The following factors should be considered when selecting the right product:
- Pipe diameter
- Wall thickness
- Emitter spacing
- Emitter flow rate
- Roll length
- Expected service life
- Above-ground or subsurface installation
- Total pipeline length
Pipes designed for seasonal use with thin walls should not be evaluated the same way as pipes manufactured for long-term use. The production plan and the frequency of removal and reinstallation are key factors when choosing the most suitable product.
Connectors
Different types of connection components are used for transitions between the main pipe and the drip line, changes in direction, and closing the ends of irrigation lines.
The main Fittings used in a drip irrigation system include:
- Coupling
- Elbow
- Tee Connector
- Valve
- Gasket
- Nipple
- Mini Valve
- End Cap
- Compression Fitting
- Line End Closure
All fittings must be fully compatible with the diameter of the irrigation pipe. Loose or incorrectly sized connections can cause water leaks, pressure loss, and uncontrolled wet areas throughout the field.
Valves and Pressure Control Equipment
Instead of irrigating large areas all at once, they can be divided into sections. Valves installed in each section allow you to control which lines are active and when.
Pressure gauges can be installed at the filter inlet, the filter outlet, and at points along the lines where necessary. These measurements make it easier to detect filter clogging or unexpected pressure drops in the lines.
Fertilization Unit
Water-soluble fertilizers can be added to irrigation water using appropriate equipment. In this practice, known as fertigation, the fertilizer is delivered to the root zone through the irrigation system.
When installing a fertilization unit, backflow prevention devices must be used, and the system must be flushed with clean water after fertilization. The compatibility of the fertilizer to be used with the system and the crop being grown must also be verified.
How Do You Set Up a Drip Irrigation System?
Drip irrigation system installation should follow a structured process, from field planning to final system testing. Laying the pipes before properly planning the system can lead to unnecessary connection points and pipeline length issues.
1. A Land Use Plan Is Prepared
The water source, main pipeline route, distribution lines, and crop rows are shown on a plan. If there is a significant slope on the site, the direction in which the water will flow is also evaluated.
Long rows can be divided into sections when necessary. This allows the amount of water a single drip line must carry and the pressure loss to be kept under control.2. The Filter System Is Installed
The filter should be installed immediately after the water source in an easily accessible location, preferably on a level surface. If a pump is used, the order of the equipment should be planned according to the project requirements.
Installing monitoring points at the filter inlet and outlet makes it easier to track pressure differences that may occur during system operation.
3. The Main Irrigation Pipe Is Laid
The main irrigation pipe should be routed from the water source to the distribution points along a carefully planned path. It should be installed in a location where it will not be damaged by vehicle traffic, cultivation equipment, or sharp surfaces.
Unnecessary bends in the pipeline should be avoided. Every sharp turn and restrictive connection can increase pressure loss throughout the irrigation system.
4. Distribution Lines Are Installed
The main irrigation pipe should be routed from the water source to the distribution points along a carefully planned path. It should be installed in a location where it will not be damaged by vehicle traffic, cultivation equipment, or sharp surfaces.
Unnecessary bends in the pipeline should be avoided. Every sharp turn and restrictive connection can increase pressure loss throughout the irrigation system.
5. Drip Tubes Are Laid
Drip irrigation pipes should be laid parallel to the crop rows. Care should be taken to prevent the pipes from twisting, being crushed, or dragged across rough surfaces.
When unrolling the pipe, it should not rotate around its own axis, and the orientation of the emitters should follow the manufacturer’s installation guidelines. The pipes should not be stretched too tightly; sufficient allowance should be left to accommodate expansion and contraction caused by temperature changes.
In professional open-field applications, specialized pipe-laying equipment can be used. However, the machinery and reels must be properly adjusted to avoid damaging the pipes or the emitters during installation.
6. Connect the Drip Lines
Appropriate holes are drilled in the main or distribution pipe. Gaskets, outlet nipples, mini valves, or other transition fittings required for the project are then installed.
It is important that the hole diameter matches the connection fitting. A hole that is too large may cause leaks even when a gasket is used.
Each drip line should be securely fixed to the fitting to ensure a proper seal. The ends of the lines should not be completely closed during the initial installation; they should remain open so the system can be flushed before operation.
7. Pipes Are Rinsed with Clean Water
During installation, soil, plastic particles, or other foreign materials may enter the main line and lateral pipes. When the system is first supplied with water, these particles should be prevented from reaching the emitters.
First, water is allowed to flow through the main line and distribution pipes while their ends remain open. Then, water is supplied to the drip lines, and clean water should be allowed to flow from the end of each line.
Once the flushing process is complete, the ends of the lines are sealed using end caps or other suitable closing fittings.
8. Check Water Pressure and Distribution
After the system is activated, all connection points should be checked for leaks. The water output from the emitters at the beginning, middle, and end of the main line should be compared to ensure uniform distribution.
If the water flow is strong at the beginning of the line but weak at the end, the following factors should be investigated:
- The main pipe diameter is too small.
- The drip irrigation line is excessively long.
- The filter is dirty or has insufficient capacity.
- Too many irrigation zones are operating simultaneously.
- There are water leaks at connection points.
- The water source cannot provide an adequate flow rate.
- Elevation differences across the field have not been considered.
During testing, it is not enough to check whether the system is delivering water. It is equally important to verify that water is distributed evenly across all crop rows.
How to Choose a Drip Tube?
The right drip irrigation pipe should meet the crop’s water requirements while ensuring uniform water distribution throughout the entire irrigation line. Choosing the cheapest pipe may lead to higher operating costs during the growing season due to clogging, punctures, or uneven irrigation.
Dripper Spacing
Emitter spacing is the distance between two water outlets on a drip irrigation pipe. A wide range of spacing options is available to suit different crops and planting layouts.
The following factors should be considered when selecting the appropriate emitter spacing:
- Plant spacing
- Root zone size
- Soil water distribution characteristics
- Emitter flow rate
- Irrigation duration
- Total length of the irrigation line
It should not be assumed that every plant requires a single emitter positioned directly opposite it. The way water spreads both horizontally and vertically through the soil should also be taken into account.
Pipe Diameter
Pipe diameter affects the amount of water that can be transported and the pressure loss that occurs along the line. Using small-diameter pipes in long runs or in systems requiring high flow rates can reduce the water output at the end of the line.
Pipe diameter should not be selected based solely on the size of the plot. The length of the line, the number of emitters, and the flow rate of each emitter must be evaluated together.
Meat Thickness
The wall thickness of the pipe is directly related to its physical durability and expected service life. Pipes intended for seasonal use should not have the same technical specifications as those designed to remain in service for multiple growing seasons.
Rocky soil conditions, frequent use of agricultural machinery, and repeated installation and removal can increase the need for more durable irrigation pipes.
Differences Between Greenhouse and Open-Field Installation
In greenhouses, crop rows are typically more organized, allowing drip irrigation lines to be planned and installed with greater precision. However, the higher temperatures, humidity levels, and intensive production cycles inside a greenhouse make irrigation scheduling more critical.
In greenhouse production, the irrigation system should be evaluated together with ventilation, shading, and the characteristics of the greenhouse film. Changes in temperature and light levels inside the greenhouse can significantly affect the daily water requirements of plants.
In Antalya and throughout the Mediterranean region, high summer temperatures, intense sunlight, and increased evaporation mean that a fixed irrigation schedule may not provide consistent results throughout the growing season. When selecting Antalya Greenhouse Film and designing the irrigation infrastructure, the production season, crop type, and greenhouse climate conditions should all be considered together.
In open-field agriculture, factors such as wind, land slope, soil variations, and row length become more influential. The irrigation pipes should be protected from agricultural machinery, and a plan for seasonal pipe removal and storage should be established before installation.
Common Mistakes in Drip Irrigation Installation
The fact that the system is operating does not mean that it was installed correctly. While some errors may not be noticed on the first day, they can affect water distribution and maintenance costs as the production period progresses.
Setting Up a Filterless System
Even if the water looks clean, it may contain small particles that could clog the drip channels. Not using a filter or choosing an inadequate filter increases the risk of clogging.
Selecting a Small-Diameter Main Pipe
A small-diameter main pipe may seem economical as an initial investment. However, due to high friction losses, sufficient pressure may not reach the final sections of the line.
Keeping Drip Lines Longer Than Necessary
There is an optimal line length for each pipe, depending on its diameter, dripper spacing, and flow rate. Setting up a line that is too long without taking this limit into account can result in uneven irrigation.
Determining the Dripper Range Based Solely on Price
Using a dripper with a lower flow rate can reduce the cost of the tubing. However, if the plant roots do not receive sufficient and balanced water, this can affect crop development.
Trying to Irrigate the Entire Field at Once
If the water source’s capacity is insufficient, the land should be divided into sections. Opening too many lines at the same time can cause the overall pressure to drop.
Sealing Pipe Ends Without Flushing the Pipes
Particles that enter the pipes during installation can be carried to the drippers when the system is put into operation. For this reason, it is important to leave the lines open during the initial startup so they can be flushed.
Failing to Check Connection Points
A small leak on its own may seem insignificant. However, leaks occurring at multiple connection points can reduce system pressure and cause unnecessary water accumulation on the property.
What Are the Advantages of a Drip Irrigation System?
A properly designed drip irrigation system does more than simplify irrigation. It allows water usage, labor, and plant nutrition processes to be managed more efficiently and with greater control.
The main advantages include:
- Water is delivered directly to the root zone.
- Irrigation areas and schedules are easier to control.
- Unnecessary wetting of plant foliage can be minimized.
- Uncontrolled weed growth between crop rows can be reduced.
- Fertilizers can be applied through the irrigation system.
- Labor requirements for manual irrigation can be reduced.
- The field can be managed by dividing it into separate irrigation zones.
- Irrigation schedules can be adjusted according to each stage of plant growth.
- Water losses caused by evaporation and surface runoff can be minimized.
To achieve these benefits, the system should be inspected and maintained regularly. Incorrect pressure, clogged filters, or damaged pipes can quickly reduce the efficiency and performance of the irrigation system.
How Do You Maintain a Drip Irrigation System?
Filters should be inspected regularly and cleaned according to the level of contamination. An increase in the pressure difference between the filter inlet and outlet may indicate that the filter needs cleaning.
Drip irrigation lines should be flushed periodically throughout the growing season. Opening the ends of the lines allows accumulated sediment inside the pipes to be washed out.
The following checks should be carried out during routine maintenance:
- Inspect and clean the filter.
- Check all connection points for water leaks.
- Examine the water flow at the end of each irrigation line.
- Identify clogged or damaged emitters.
- Inspect the pipes for crushing, punctures, or other damage.
- Test the operation of all valves.
- Compare the system pressure with previous measurements.
- Flush the irrigation lines with clean water after fertigation.
At the end of the season, any pipes intended for reuse should be cleaned, collected carefully to prevent damage, and stored away from direct sunlight.
Choose the Right Materials When Installing a Drip Irrigation System
A drip irrigation system cannot be installed by simply connecting pipes and fittings at random. The production area, water source, crop rows, land slope, and the technical specifications of the emitters should all be evaluated together to ensure efficient system performance.
At Mirza Tarım, we help growers select the right drip irrigation pipes, PE coil pipes, and connection fittings for both greenhouse and open-field applications. Our goal is not to sell unnecessary products, but to recommend the correct pipe diameter, line length, and connection configuration for each production area.
By sharing the dimensions of your field, the number of crop rows, the type of crop you grow, and your available water source, you can receive professional guidance and a customized quotation for the most suitable irrigation equipment.
Frequently Asked Questions
What materials are needed for a drip irrigation system?
A basic system consists of a water source, filter, main pipe, distribution line, drip lines, valves, gaskets, fittings, and end-of-line shut-off equipment. A pump, pressure regulator, and fertilizer application unit can be added depending on the water source and production plan.
What should the dripper spacing be in centimeters?
The dripper spacing is determined based on the crop being grown, planting distance, soil structure, and dripper flow rate. A single spacing is not suitable for all plants and all soil types.
How many meters of drip irrigation tubing can be installed?
The appropriate line length depends on the pipe diameter, dripper spacing, dripper flow rate, inlet pressure, and terrain slope. If the line is made longer than necessary, a difference in water distribution may occur between the beginning and the end of the line.
Can a drip irrigation system be used without a filter?
It is not recommended to use a filter. Sand, sediment, and organic matter in the water can clog the dripper channels. The type and capacity of the filter should be selected based on the water source being used.
Is the drip irrigation tubing installed underground?
Underground installation is possible, but pipes with the appropriate technical specifications for this purpose must be used. The installation depth, soil preparation activities, root structure, and maintenance method should be determined during the design phase.
How long should a drip irrigation system be left running?
The irrigation duration varies depending on the plant’s growth stage, weather conditions, soil structure, dripper flow rate, and the needs of the root zone. Rather than using a fixed duration, the irrigation schedule should be based on monitoring soil moisture levels and the plant’s needs.
How can clogs in drip irrigation tubing be prevented?
Using the correct filter, cleaning the filter regularly, flushing the pipes at regular intervals, and running the system with clean water after fertilization reduces the risk of clogging. Scaling issues related to the chemical composition of the water source should also be evaluated.
